Well I know I said I would post this last weekend, but time got away from me. If you have any questions about this tutorial, please feel free to ask. This card is “basically” made with a half sheet of 8 ½ x 11. Of course adding layers and other papers is always an option.
Gather your supplies. You will need:
Papers you have chosen
Paper Cutter
Adhesive
Stamps of your choice
Embellishments of your choice

Cut your papers into ¼ sheets.

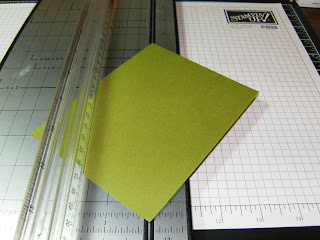
Keeping one of your ¼ sheets whole for the back of the card, cut your remaining papers in half diagonally.


Because I am incapable of making a card without layers, I have chosen to layer each of my diagonal layers with two more papers. I have marked the second layer with the cut line marked ¼” in on the long side.

I then lay out my cross pieces in the direction they are going to be placed on the card and adhere them to my first layer.

The cutting line on the next layer is marked in ½”, making sure that the pieces will lay in the right direction when placed on the cross piece.

Adhere this layer to your crosspieces. You now have all three components of the card. If you weren’t using extra layers you would have been able to accomplish this entire card with one ½ sheet of 8 ½ x 11 paper.

Adhere your bottom cross piece layer to the card. I have drawn a squiggly line where the adhesive should be applied. If it is applied in the “wrong” place, you cannot get your small insert card into the crisscross. Not that I speak from experience making this mistake. :)


Next, adhere the top crisscross piece by placing the adhesive where I have the squiggly lines.


I cut my interior card 3 ½ x 4 ½ or whatever seems to fit taking into consideration that there is adhesive on each side of the card.

Embellish as desired. This seems long and complicated, but it really is easy. The main reason I like this method is that it uses less paper.

Thank you for looking. If you have any questions, please feel free to email me: lsadamsdance@msn.com


18 comments:
What a great way to create the same look and use half the cardstock! Thank you so much for sharing this! It's AWESOME!
You're doing a WONDERFUL job on your blog, by the way! :)
Super tutorial. I'm looking forward to trying this out.
great idea....love the triple layers too!
Wow! I love that card. Learn something wonderful everyday! Thanks for the idea!
Great tutorial. TFS!
great step by step tutorial :)
Thanks so much for the tutorial, I was waiting for this. Beautiful job on yours!
Thank you for the tutorial! Great card!
criss cross cards are my fave to mkae...yours looks super!!! >"<
Awesome card! Great instructions. I'm going to have to try one of these now.
Very cool design...love how you designed it too!
Thanks for sharing it!
great tutorial on these...
Aren't these fun!!
Rochelle SBS10
Thanks for the tutorial!
Great tutorial ! Now if I can make mine look as nice as yours we'll be all set ! LOL
Beautiful card! Great tutorial! Thank you!
what a fun new way to make a criss cross card using less paper, thanks for sharing
Thanks for the tutorial! I have tons of designer paper to use!
Post a Comment